
WOW, we got one more day so it’s time to make this day awesome by learning something new.?
Hello friends, hope you are doing good. So today we are going to learn Dagger 2. I have a feeling we will enjoy today’s post.
Motivation:
Motivation is same which I already shared with you in part 1.
Revision:
In part 1 we discussed:
- What is a dependency?
- What is a dependent?
- What is a Dependency Injection ( DI )?
- Famous techniques/strategies for DI ( Constructor Injection, Method Injection, Field Injection )
- How to make a dependency graph from code.
Dagger 2:
Before going to start Dagger 2. I have one question. How many people know what is annotation processor? Wow. A lot of people know but to make our base strong I am going to explain again annotation processor. This is a really awesome tool which generates code. Like we can say Don’t repeat yourself instead generate your code by using annotation processor. In these days we are using a lot of libs which are using this like Butter Knife, Android Databinding, Dagger 2 and more.
In simple words, we can say. I am going to create a magic word. As I will use that word compiler should generate a code for me like we used to in Butter Knife.
@BindView(R.id.title) TextView title;
As compiler will read @BindView that will generate all boilerplate code for us. If you guys remember findViewById() then casting and more boilerplate code. So by using this magic word @BindView, I am saying to the compiler. Hey, when you read this magic word please write a complete code on my behalf. A good benefit of this approach everything is compiled time so there should not be an issue at runtime. In the same way, we have many other magic words in Android like @StringRes, @NotNull and more. Now I am expecting you guys have some logical concept of Annotation Processing.
Now I am going to share with you some terms. Which we will use later in our app.
Component:
A part or element of a larger whole. In Android, we can say some View, Activity, Fragment or maybe Network Repository has a Component. Which will provide all the dependencies. Also, there is a possibility one component is dependent on the other component.
Module:
Each of a set of standardized parts or independent units that can be used to construct a more complex structure, such as an item of furniture or a building. In Android, we can say every component include factory or factories classes which provide all the dependencies. We will take all these factories into one place and that class will be a module of this component, which provides objects to create some complex UI or algorithm.
Before going to next term I want to make a relationship between component and module pictorially.
A component is always as a whole or complete feature which will give us the ability to achieve some meaningful functionality by providing its dependencies. Now to get that complete component functionality, a component may be dependent upon some other components or maybe not but component always includes classes which always know how to generate a dependency like the creation of the Adapter for the recycled view. This creation code always available in the module. So every component always includes one or more modules to achieve some useful functionality. If we try to create a graph we will get something like shown below images.


As a conclusion of Component and Module:
Component -> Maybe Dependent on -> Component or Components
Component -> always Include -> one or more modules
Now it’s time to check what things are available inside of a module.
To achieve anything in a code we need some logical units or functions which work together or maybe you can say these functions are dependent upon each other. All those small units or functions are available in the module. Or we can say all these small units or functions which may are independent or may be dependent upon other small units will be provided in this module.
I know things are little confused now so it’s time to take one practical example.
I am going to take our HomeActivity.class which we know we used in the last post. We will apply all our above terms in this class to grab Component and Module concept.
package uwanttolearn.dagger2.java.home;

import android.support.v7.app.AppCompatActivity;
import android.os.Bundle;
import android.support.v7.widget.LinearLayoutManager;
import android.support.v7.widget.RecyclerView;
import android.view.View;
import android.widget.ProgressBar;
import android.widget.Toast;

import com.bumptech.glide.Glide;

import java.util.ArrayList;

import io.reactivex.android.schedulers.AndroidSchedulers;
import io.reactivex.disposables.Disposable;
import io.reactivex.schedulers.Schedulers;
import uwanttolearn.dagger2.R;
import uwanttolearn.dagger2.java.app.App;
import uwanttolearn.dagger2.java.detail.DetailActivity;
import uwanttolearn.dagger2.java.home.adapter.HomeAdapter;
import uwanttolearn.dagger2.java.repositories.github.GitHubRepository;

public class HomeActivity extends AppCompatActivity {

    private RecyclerView recyclerView;
    private ProgressBar progressBar;
    private GitHubRepository gitHubRepository;
    private HomeAdapter homeAdapter;
    private RecyclerView.LayoutManager layoutManager;
    private Disposable disposable;
    private Glide glide;

    @Override
    protected void onCreate(Bundle savedInstanceState) {
        super.onCreate(savedInstanceState);
        setContentView(R.layout.activity_home);
        gitHubRepository = App.getApp().getGitHubRepository();
        glide = App.getApp().getGlide();
        initViews();
        initRecyclerView();
        loadData();
        homeAdapter.getClickSubject().subscribe(gitHubUser -> DetailActivity.start(this,
                gitHubUser.getLogin(), gitHubUser.getAvatarUrl()));
    }

    @Override
    protected void onDestroy() {
        super.onDestroy();
        if (disposable != null && !disposable.isDisposed())
            disposable.dispose();
    }

    private void initViews() {
        recyclerView = (RecyclerView) findViewById(R.id.MainActivity_recycler_view);
        progressBar = (ProgressBar) findViewById(R.id.MainActivity_progress_bar);
    }

    private void initRecyclerView() {
        layoutManager = new LinearLayoutManager(this);
        homeAdapter = new HomeAdapter(new ArrayList<>(), glide);
        recyclerView.setLayoutManager(layoutManager);
        recyclerView.setAdapter(homeAdapter);
    }

    private void loadData() {
        gitHubRepository.getUsers()
                .subscribeOn(Schedulers.io())
                .observeOn(AndroidSchedulers.mainThread())
                .subscribe(gitHubUsers ->
                        {
                            homeAdapter.add(gitHubUsers);
                            progressBar.setVisibility(View.GONE);
                        },
                        error -> Toast.makeText(this, error.getMessage(), Toast.LENGTH_SHORT).show(),
                        () -> {
                        },
                        disposable -> this.disposable = disposable);
    }
}
It’s time to start refactoring according to our strategy.
HomeActivity dependent upon all the fields which are shown below.

So I am going to say I need a one HomeActivityComponent which will provide me all these dependencies. Next, we already know every component should include minimum one module. So I am going to create a HomeActivityModule.
Going good. It’s time to figure it out what are the small units which should be the part of our HomeActivityModule. Yes, you guys are right we already figure it out all the dependencies in above image.
    RecyclerView recyclerView;
    ProgressBar progressBar;
    GitHubRepository gitHubRepository;
    HomeAdapter homeAdapter;
    RecyclerView.LayoutManager layoutManager;
    Disposable disposable;
    Glide glide;
Now our module will be responsible to provide all these fields to the component. Also, a module should know how to create these field objects. Now first we will analyze are any unit or field is dependent upon any other field.
Glide: Independent unit
ProgressBar: Independent unit
GitHubRepository: We already discussed in the last post. That is the dependent upon many other small modules like Retrofit, OkHttp and more. So will take this as a separate component which I will discuss later.
HomeAdapter: Independent unit
RecyclerView.LayoutManager: Independent unit
Disposable: Independent unit
RecyclerView: Dependent on HomeAdapter and LayoutManager.
I think that is enough for this post. So there are some other topics like scope, sub-components, @inject etc which we will discuss in next post. It’s time to make a relationship with all above concepts by going practical.
We discussed annotation processing. Which generates a code by reading some magic keyword on the behalf of a developer at compile time. After that, we discuss component and modules. Then we figure it out module contain small unit on which our component is dependent. So module provides those small units.
In Dagger 2, we have a @Component as a Magic word but a concept is same just we discuss only I need to show you the syntax of this. Next @Module is also a magic word inside a Dagger 2, which has the same concept which we already discussed. Next @Provide again we have a Magic word in Dagger 2 which has the same concept of a module which we already discussed. WOW.
Note: Magic word means a lot of boilerplate code which will be generated by the compiler. Which I will show you later. As a computer scientist we know there is no magic in the computer, instead, everything has a code. 🙂
For Dagger 2 refactoring code available in branch Part2Refactoring.
We already reviewed the HomeActivity code and theoretically, we already analyzed. So it’s time to use that analysis and implement our code.
The first thing we finalized, we should have a HomeActivityComponent.class.

So that is a simple syntax which you can see in above image, to create a Component in Dagger 2.
Next, we discussed we need to create a HomeActivitryModule.class which will be the part of our Component.

That is really simple. Now you can easily make a logical graph in your mind by seeing above image.
@Compment(module = HomeAcitvityModule.class) its mean HomeActivityComponent is including a HomeActivityModule and our module is telling to a Dagger 2 I am a module by using @Module just as shown in above image. Now the graph you have in your mind basically that is already created in the form of a code by using the power of Annotation Processing. Every time when you will add something new in Dagger 2 class you need to compile your code by using Command + F9 key. Because we already know annotation processing only able to create a code when we compile our project. Good. I am going to show you some code which is generated by Dagger 2 for our above Component but does not take tension of this code. If you think that is complex then try to forget, that is not important in perspective Dagge 2 learning curve. I am showing you because I want to clear there is no magic.

There is one more confusion which mostly developer faced. They are not able to see the abstraction between Component, Application(like HomeActivity.class) and Module code. So before going to start next step, I want to clear that confusion.
Guys our Application code only know about the Component. It means any dependency I need I will ask for a component. Which I will show you later in this post. Now the question is why not Module because they know how to create that dependency. That is a catchy point and one really big benefit of Dagger 2. Module always knows how to create some object or dependency which required by the Component. It’s mean our Application only know about the Component. That never talk with Module instead our Application code never know there is any module. The Component then discusses with Module, what they want as a dependency for our code. So our Application code never know, how some dependency is created instead Application code always get a proper dependency which is always ready to use.
In HomeActivity Dependency graph we already know what are the dependencies we need to ask to our Component.
@Component(modules = HomeActivityModule.class)
public interface HomeActivityComponent {

    RecyclerView getRecyclerView();
    ProgressBar getProgressbar();
    GitHubRepository getGitHubRepository();
    HomeAdapter getHomeAdapter();
    RecyclerView.LayoutManager getLayoutManager();
    Disposable getDisposable();
    Glide getGlide();
}
Now If I compile my code, I will get errors on Gradle console. Because I already satisfied my dependencies from Application code perspective but when my Component will ask for the dependency to Module, Module will be confused because there is no code in module implemented by us which will create that dependency. So dagger will give us some error as shown below.

For the time being, I am going to remove all dependencies from our component except LayoutManager. So we can grab concept easily later we will add more complexity.
@Component(modules = HomeActivityModule.class)
public interface HomeActivityComponent {
    RecyclerView.LayoutManager getLayoutManager();
}
Now I need to provide this LayoutManager to Component from module. But before going to implement that we need to check currently how we are creating this object in our Application code.
private void initRecyclerView() {
    layoutManager = new LinearLayoutManager(this);
    ...
}
It’s time to do a refactor our code.
@Module
public class HomeActivityModule {

    @Provides
    public RecyclerView.LayoutManager layoutManager(){
        return new LinearLayoutManager(context);
    }
}
Here @Provide is a new magic word. Which basically behind the scene create a relationship with its dependent method in the component.

In above image, you can easily figure it out how we are creating a relationship by using keywords and as we will compile our code. All the boilerplate code will be generated by the compiler for us.
There is an error if you saw context is red. Its mean that is a bug. Now we know our Module also dependent upon a Context. For that, we have one option we can send that Context in a constructor of a module. So now time to implement constructor in a module.
@Module
public class HomeActivityModule {

    private final Context context;

    public HomeActivityModule(Context context) {
        this.context = context;
    }

    @Provides
    public RecyclerView.LayoutManager layoutManager(){
        return new LinearLayoutManager(context);
    }
}
Next step how we use this component in our application code.
public class HomeActivity extends AppCompatActivity {
    ...
    private HomeActivityComponent homeActivityComponent;

    @Override
    protected void onCreate(Bundle savedInstanceState) {
        super.onCreate(savedInstanceState);
        setContentView(R.layout.activity_home);

        homeActivityComponent = DaggerHomeActivityComponent.builder()
                .homeActivityModule(new HomeActivityModule(this))
                .build();
        ...
    }
      .....
}
If there is no error after doing a compile. Dagger will generate some utility classes which we will use to manage our component dependencies. Dagger2 always add Dagger at the start of our Component name just like as shown above (DaggerHomeActivityComponent). Also, Dagger 2 generate all the methods, which are required to create a proper graph for us, like we need to call a builder method in which I need to give a homeActivityModule object and in the end I need to call build.

Now its time to refactor our HomeActivity code.
    private void initRecyclerView() {
//      layoutManager = new LinearLayoutManager(this);
        layoutManager = homeActivityComponent.getLayoutManager();
        ...
    }
“e81780c5ff7abb10195ebb83fcf9f152f17ade1a” this is the commit number to get code upto this point.
I have a feeling we should do more practice to grasp this core concept. So for that, I am doing HomeAdapter dependency moving to Component just like we did for LayoutManager.
@Component(modules = HomeActivityModule.class)
public interface HomeActivityComponent {

    RecyclerView.LayoutManager getLayoutManager();

    HomeAdapter getHomeAdapter(); // New dependency which I am adding now in Component
}
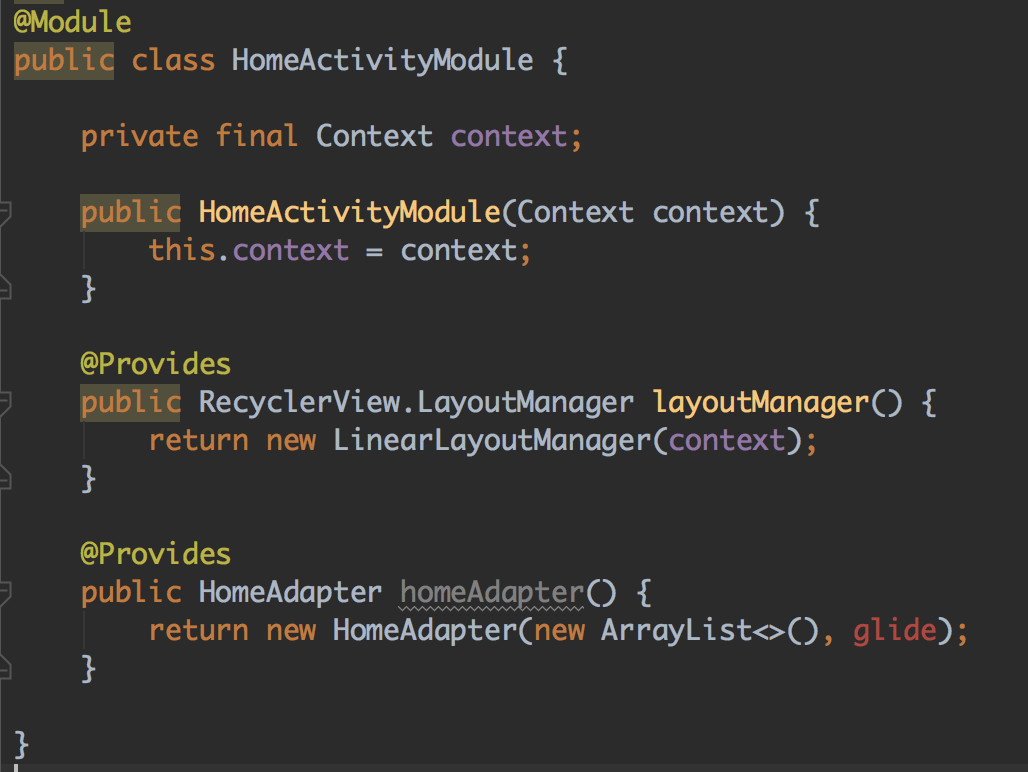
So now we are facing one more issue as shown in above Module code. HomeAdpter creation required Glide object also. For the time being I am going to send that in Constructor of our Module code, Remember which is not a proper approach in Dagger 2 but currently, I don’t want to add complexity. Later I will show you, how we will use an AppComponent to get that object.
After doing above changes we need to check our code again in module + HomeActivity.class.
@Module
public class HomeActivityModule {

    private final Context context;
    private final Glide glide; // Remeber that is not a proper approach. Later we will refactor this also.

    public HomeActivityModule(Context context, Glide glide) {
        this.context = context;
        this.glide = glide;
    }

    @Provides
    public RecyclerView.LayoutManager layoutManager() {
        return new LinearLayoutManager(context);
    }

    @Provides
    public HomeAdapter homeAdapter() {
        return new HomeAdapter(new ArrayList<>(), glide);
    }

}
public class HomeActivity extends AppCompatActivity {

      ...
//  private Glide glide; // Dependency moved into Component. So removed from our Class

    private HomeActivityComponent homeActivityComponent;

    @Override
    protected void onCreate(Bundle savedInstanceState) {
        super.onCreate(savedInstanceState);
        setContentView(R.layout.activity_home);

        homeActivityComponent = DaggerHomeActivityComponent.builder()
                .homeActivityModule(new HomeActivityModule(this, App.getApp().getGlide())) // Bad approach for the time being
                .build();
       ....
    }
      ....
    private void initRecyclerView() {
//      layoutManager = new LinearLayoutManager(this);
        layoutManager = homeActivityComponent.getLayoutManager();

//      homeAdapter = new HomeAdapter(new ArrayList<>(), glide); Removed from HomeActivity and moved into Component.
        homeAdapter = homeActivityComponent.getHomeAdapter(); // Here we are getting our dependency from Component.
        recyclerView.setLayoutManager(layoutManager);
        recyclerView.setAdapter(homeAdapter);
    }
    ....
}
I think that is enough for this post. Now I am going to show you some benefits which we can see up to this point from Dagger 2. Truly saying that is not a lot of benefits but currently we are on the basic level.
Now you can see we can easily follow Open Closed Principle. Like I want to change my LayoutManager from Linear Layout to GridLayout. I will do only change in Module file and after that everything will work.
@Module
public class HomeActivityModule {

     ....
//    @Provides
//    public RecyclerView.LayoutManager layoutManager() {
//        return new LinearLayoutManager(context);
//    }

    @Provides
    public RecyclerView.LayoutManager layoutManager() {
        return new GridLayoutManager(context,2);
    }
   ...
}
In the end, I want to repeat once again. AppCode only knows about Component. Anything AppCode required as a dependency, that always asks for Component. Now it’s mean our AppCode is no more responsible to create objects instead that only used the objects which that will ask for Component. So there is one abstraction layer already added by Dagger 2. Second, Component always gave orders to Module to provide the dependency object. So module only knows how to create a dependency. Its mean if we change the creation of some object only our module code will be changed not the AppCode.
Part2 Code on Github.
Dagger 2 ( Caution: PLEASE TRY AT HOME ) Part 3
Conclusion:
The most important thing, guys you need to do hands dirty with Dagger 2 code. Maybe some of you feel, that is useless or may be frustrated but try to fight with your self. That is amazing and their benefits are a lot. Currently, I am not able to show you real benefits because that required strong core concepts. Which I try my best to share with you in this post. One more important point. Sometimes Dagger 2 errors are not straightforward in the console. You need to work with patients. Maybe you can add –stacktrace –debug into Command line options to get more proper errors on the console. Preferences -> Compiler -> Command-line Options: –stacktrace –debug.

I hope you enjoyed this post and this post will increase your knowledge about Dagger 2. Thanks, Have a nice day. BYE :).
Thanks for writing this next article so soon ! As usual, great article. Also, I have read around 1000 articles on the web but this is the only article which has made my basic concepts clear. Please write the next article soon. Keep up the good work.
Thank you for appreciation.
Hi Hafeez. This seriously cleared many tangled dendrites from my head. I am waiting for the AppComponent part where you will provide the Glide instance. Thanks.
First thanks for the appreciation.
Now for the next tutorial. I am not sure I will do complete Glide instance in next part or part 4. Currently, I am trying to convince my self what will be more good to grab the concept of Dagger 2 for my readers. So if I choose the first Injection then I will do AppComponent in part 4, For long wait, I am really sorry but I hope you will understand. 🙂 Thanks
Yes waiting as I am able to understand. However, it will be really good if you post it with bit urgency as I am using this in my next project. Kindly take this as a humble request,. Please 🙂
> In these days we are using a lot of libs which are using this like … Retrofit2
Retrofit and Retrofit 2 don’t have any annotation processing, it’s completely runtime libs.
Retrofit uses reflections (particularly Proxy API) to generate implementation on runtime.
Thanks for correcting my mistake. I will do the update.
> many other magic words in Android like @StringRes, @NotNull
@StringRes, @NonNull and other annotations from Android support annotations library don’t have relations to annotation processing out of the box
These annotations are used for static code analysis or another tooling, but not to generate code during AP (of course you can use them during AP, but they have no any processing by default)
Thanks for correcting my mistake. I will do the update.